BTD 3 Multi-Track Mastery Guide
Master BTD3's multi-track gameplay with expert strategies for defending multiple paths, utilizing new towers like Spike-o-pult and Monkey Beacon, and unlocking all 8 secret tracks.
Introduction -- What's New in BTD3
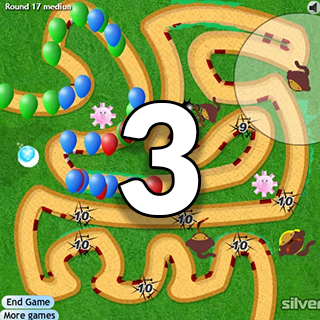
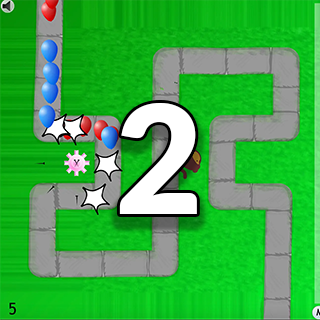
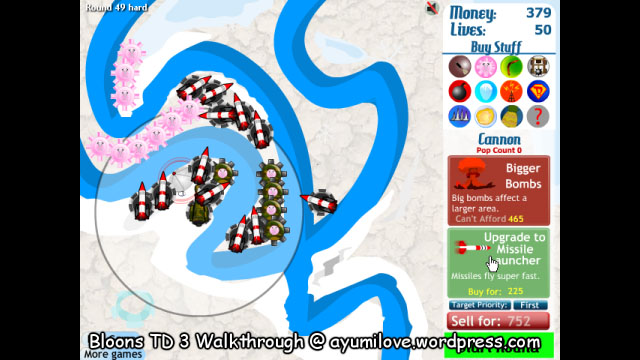
Bloons Tower Defense 3 (BTD3) expands on its predecessor with more content and improved gameplay mechanics. Notably, BTD3 introduces multiple-track maps where bloons can travel along two or even three separate paths simultaneously. This multi-lane feature is a major change from BTD2's single-path tracks and adds a new layer of strategy. BTD3 also adds new towers and items: the Spike-o-pult tower (a catapult monkey) and the Monkey Beacon support tower, along with exploding Pineapple road bombs. These new towers complement the returning arsenal (dart monkeys, tack shooters, cannons, etc.) and come with more upgrades per tower than before. Additionally, BTD3 includes new bloon types like the Ceramic (Brown) Bloon -- which requires multiple hits to pop -- and the mighty M.O.A.B. blimp, a boss bloon that bursts into several ceramics when destroyed. The game's difficulty curve was tuned down from the very hard BTD2, and a new Freeplay mode allows you to continue past round 50 up to round 150, providing extra longevity once you beat the main 50 levels. Finally, BTD3 features 8 unique tracks (four available initially and four "secret" tracks unlocked after beating the first four) -- giving players plenty of new environments to conquer.
Strategies for Multi-Track Gameplay
Having to defend multiple bloon lanes at once is the defining challenge of BTD3. Success on these multi-track maps requires smart tower placement and resource splitting:
Cover Each Entrance
Ensure every bloon entrance has some defense. You can either dedicate certain towers to one track or position towers to cover multiple tracks at once. For example, place a bomb shooter or tack shooter near the point where lanes are close together, so its explosion or spread hits bloons from both paths. Towers focused on one lane will excel at that lane but can't help with others, whereas towers in range of two lanes provide more balanced coverage.
Centralize and Coordinate Fire
Try to build near the center or intersection of paths whenever possible. This way, towers can attack bloons from different lanes without repositioning. If lanes merge or run parallel, concentrate firepower at those convergence points to create a kill-zone.
Manage Split Waves
Bloon waves split between lanes are effectively thinner on each lane. Take advantage of this by focusing fire to clear one lane quickly, then retarget to the other lane. For instance, if one path's bloons arrive slightly earlier, a tower covering both will shoot that lane first and potentially finish them off before turning to the second lane. This staggers the bloons and prevents your towers from being overwhelmed all at once.
Use Global and Area Attacks
Towers that have global range or area-of-effect excel on multi-track maps. Pre-place Road Spikes at the end of each path as insurance, and drop Pineapples on congested lanes. The Monkey Beacon's activated ability (Super Monkey Storm) can also clear the entire screen in an emergency. Keep a Beacon ready on multi-lane rounds to nuke leaks on far-flung tracks simultaneously.
Adjust Target Priorities
In BTD3 you can set some tower target priorities (First, Last, etc.). On multi-lane maps, this can be useful -- for instance, set a fast-firing tower to Last so it targets bloons deeper along a long lane while another tower handles the ones right at the entrance. However, remember that a tower will always fire at bloons closest to the exit if multiple lanes are in range, so plan tower positions accordingly to control which lane they prioritize.
Slow and Stall Bloons
Utilizing the Ice Ball and Monkey Glue can buy you time on dual tracks. Freezing or gluing bloons on one path delays them while your towers handle the other path. Just note that frozen bloons require explosives, boomerangs (with Sonic Boom), or Super Monkey plasma to pop. Glue will slow bloons on one lane, staggering their arrival so your defenses can switch focus more calmly. This "partitioning" strategy is key in multi-lane maps: by stalling one group, you effectively break the simultaneous rush into sequential chunks.
General Multi-Track Advice
Overall, don't dump all towers on one lane -- balance your defenses. Early on, build a cheap Dart or Tack on each entrance to avoid getting blindsided. As you earn more money, add overlapping coverage (like Bomb Shooters and Boomerangs) that can assist wherever the bloons are heaviest. With practice, you'll get a feel for which tracks tend to leak so you can reinforce them preemptively.
Track Breakdown -- Know Your Battlefields
BTD3 comes with 8 tracks, each with unique layouts and challenges. Four tracks are available from the start, and four "secret" tracks unlock once you beat the initial ones on any difficulty. The tracks get progressively harder, so understanding their features is crucial:
Track 1 -- Easy Street
Long winding dirt road -- beginner friendly
A long, winding dirt road in a grassy field. It has one entrance and one exit, and the length of the path makes it forgiving for new players. This is considered one of the easiest tracks in the series due to its long track length and gentle curves.
When to use:
Track 2 -- Intermediate Grassland
Single path with shorter loops
Another single-path track with one entrance/exit, but slightly shorter or more complex than Track 1. Expect a few more turns or a shorter loop, increasing difficulty a bit.
When to use:
Track 3 -- Figure Eight
Winding overlapping loops
The last of the initial easy tracks, featuring a winding pattern with overlapping loops. One entrance and exit still. This one might have a trickier shape.
When to use:
Track 4 -- Snow River (Multi-Path)
First multi-track map -- snowy dual lanes
The fourth track (initially unlocked) is the first multi-track map, set in a snowy terrain. Two separate bloon lanes start at the far left and top left of the screen and head toward two different exits (top right and bottom). This is the hardest of the first four tracks. Unique Challenge: Defending two entrances and two exits in a snowy map with no water.
When to use:
Map 4 (Snow River) on Hard difficulty -- master multi-lane defense to conquer this track.
Track 5 -- Desert Curve
Unlockable single path -- tricky short route
An unlocked bonus track (once you beat one of the first four) set in a desert or dirt road. It's a single-path track again, but dubbed "tricky" by some players. Possibly it has a shorter route or a sharp S-curve that makes targeting harder.
When to use:
Track 6 -- Crossroads (Multi-Path)
Two intersecting bloon lanes
A multi-route track unlocked later. It likely features two entrances similar to Track 4 but perhaps they intersect or cross each other. Unique Challenge: Two paths that possibly share a middle section.
When to use:
Track 7 -- The Gauntlet
Short and complex -- little room for error
Another unlocked track with a single path, but likely the shortest or most complex route of all single-lane maps. Possibly a zigzag or very tight loop track. Unique Challenge: Very short bloon travel distance -- little room for error.
When to use:
Track 8 -- Factory (Triple Path Mayhem)
Three lanes -- the ultimate BTD3 challenge
The final unlockable track and the ultimate test. It features three entrances and three exits in a factory-like setting. This is the only BTD3 track with more than two lanes, making it especially chaotic. Bloons will pour in from three directions, dividing your attention and forces. Unique Challenge: Juggling three lanes means you essentially have to build three mini-defenses or find ways to cover all at once.
When to use:
Remember that beating any track on Easy, Medium, or Hard will contribute to unlocking the later tracks. If one gives you trouble, try a different order -- you only need some medal on the first four to open up tracks 5-8.
New Towers in BTD3 and How to Use Them
BTD3's new towers can give you a major edge once you understand their strengths. Here are the standout additions and tips for using them optimally:
Spike-o-pult
Rolling spike balls for line-piercing damage
Introduced as a brand-new tower in BTD3, the Spike-o-pult is essentially a Dart Monkey that has traded darts for a giant spiked ball. It launches these spiked balls that roll along the track, popping many bloons in a line (1 damage each, with 6 pierce by default). The spike ball moves more slowly than a dart but travels through all bloons it hits, making the Spike-o-pult excellent against straight lines or tightly clustered bloons.
When to use:
Monkey Beacon
Support tower -- boosts nearby towers and unlocks Super Monkey Storm
Another major addition in BTD3, the Monkey Beacon is a support tower rather than a direct attacker. It projects a radius aura that increases the range (and on upgrade, attack speed) of all towers within its area. Essentially, it's an early version of what later games call the Monkey Village. The Beacon itself doesn't pop bloons, but its upgrades unlock a Top-Secret Weapon: the Super Monkey Storm ability. When you fully upgrade a Beacon to a Monkey Storm Beacon, you can spend money to call in a squadron of Super Monkeys that instantly destroy all on-screen bloons (except MOABs) as a one-time strike.
When to use:
Exploding Pineapple
Placeable road bomb -- timed area explosion
While not a tower (it's a road item), the Pineapple is new to BTD3 and worth mentioning. It's a placeable bomb that explodes after 3 seconds, popping any bloons in its blast radius. Pineapples cost a small amount of money and can be manually dropped onto the track.
When to use:
These new additions complement the existing towers: for example, you can combine a Monkey Beacon with Super Monkeys and Spike-o-pults for a devastating high-range combo (Beacon extends their reach, Spike-o-pult handles group waves, Super Monkey snipes strays). By incorporating the Spike-o-pult and Monkey Beacon into your strategy, you'll have powerful new ways to handle BTD3's challenges.
Tips for New Players to Succeed on All Tracks
Finally, let's go over some core tips that apply to Bloons TD 3 in general. Whether you're playing on the easy tracks or the toughest ones, these guidelines will improve your gameplay:
Balance Your Upgrades and New Towers
Money is tight in early rounds, so spend wisely. A common mistake is to buy too many basic towers without upgrading them -- upgraded towers are significantly stronger. Focus on a few key towers and level them up as needed. For example, giving your Dart Monkey Piercing Darts and Long Range early can carry the first several rounds cheaply. Conversely, don't over-upgrade one tower while neglecting others; having a mix (some upgraded, some new) is important as bloon waves intensify. In short, keep upgrading as bloons get tougher. By mid-game you should have second-tier upgrades on most of your main towers.
Have Lead Popping Power by Round 20
Lead bloons show up in round 20 and can only be popped by explosions or the Pineapple (sharp objects like darts and tacks won't work). Make sure to have a Cannon (Bomb Tower) or a ready supply of Pineapples by that time. Many new players lose lives on the first lead wave because they relied solely on dart-based towers -- don't let that be you. A single Bomb Tower with the Extra Range upgrade placed where it can hit bloons early will handle leads easily.
Watch Out for Black and White Bloons
These appear in mid-rounds (Blacks and Whites spawn from popped Zebra bloons). Black bloons are immune to explosions, and White bloons are immune to freezing. This means your Bomb Cannons can't pop Blacks at all, and your Ice Ball can't freeze Whites. Plan accordingly: have sharp towers (like Blade Shooters, Spike-o-pults, or Super Monkeys) to handle Black bloons, since bombs will just pass through them. For White bloons, your Ice Tower won't stop them, but glue and bombs still work fine. A diverse tower mix ensures you have coverage for all bloon types -- for example, a combo of a Bomb Tower plus a Tack Shooter covers each other's weaknesses nicely (bomb pops leads which tack can't, tack pops blacks which bomb can't).
Use the Monkey Beacon Buff Strategically
As mentioned, Monkey Beacon is very useful -- don't ignore it just because it doesn't attack directly. Placing a Beacon in the center of your setup can dramatically increase your towers' effectiveness. The extended range means more time shooting bloons, and the attack speed boost (with upgrade) means more shots per second. This effectively multiplies your damage without needing additional towers. It's often better to buff 3-4 strong towers with a Beacon than to place 3-4 more unbuffed towers. Also, position your Beacon so its radius includes high-impact towers like Super Monkeys or Spike-o-pults for maximum benefit.
Keep Towers Central and Cover the Map
Try not to cluster everything at the very start of the track. If bloons slip past an all-frontloaded defense, you'll have nothing to catch them. Instead, spread key towers along the bloon path -- some at the beginning (to thin out waves early), some in the middle, and at least one near the end as a backup. A "last chance" Dart Monkey or two near the exit can save you from minor leaks. This way, if bloons get through your front line, they have to face another line of defense before escaping. As you advance, you'll learn which rounds send fast bloons that might dart through your initial defenses; having a monkey at the end set to Last or Strong can pick those off.
Adapt Tower Placement to Track Layout
Every track has hot spots -- typically corners or loops where towers can get multiple shots in. Identify these on each map and use them. For example, on a loop, a tower in the middle can attack bloons on both sides of the loop (essentially doubling its opportunities to pop bloons). On straight segments, Spike-o-pults and Super Monkeys excel. On tight curves, a Tack Shooter (especially upgraded to Blade Shooter) placed right in the bend will hit bloons as they turn through its radius. Tailor your strategy to the map's geometry.
Don't Neglect Camo Detection
Note: The classic BTD3 Flash version did not prominently feature camo bloons (camos became a bigger mechanic in later BTD games). However, some versions (e.g., mobile or certain updates) did include a Camo Bloon type that required a Monkey Beacon upgrade (Sonar) to detect. If you're playing a version with camos, make sure to get the Beacon's detection upgrade or have a Super Monkey (which in later games can detect camo with certain upgrades). Generally, keep an eye on bloon types introduced -- if you see a note about "stealth" bloons, prepare accordingly.
Leverage Freeplay (Rounds 51+)
Once you beat round 50, you can continue into Freeplay mode up to round 150 in BTD3. The bloons will get extremely tough by then. If you're aiming to go deep into Freeplay, prioritize maximizing your income and sell wisely. For instance, by round 50 you should have multiple Super Monkeys (they are expensive but necessary for very late-game popping power). Sell lower-tier towers that aren't contributing much and use the cash to place fully upgraded Super Monkeys or a network of Monkey Beacons to support them. Also, stack Road Spikes at exits in later freeplay rounds -- they can catch stray ceramics or MOAB children when your defenses are overwhelmed. Freeplay is mostly for fun/bragging rights in BTD3, but it's a good test of an efficient build. Aim to have a balanced defense by round 50: a mix of AoE (bombs), support (beacon, ice, glue), and high DPS (super monkeys, spike-o-pult) so you can survive as long as possible in the bonus rounds.
Practice and Learn from Each Attempt
BTD3, especially on multi-track maps and Hard difficulty, can surprise you with a sudden rush (like the round 37 MOAB or the fast pink bloon swarms). Don't be discouraged if a new track or round catches you off guard. Use continue (if available) or simply restart with new knowledge. For example, if round 44's double MOAB gave you trouble, next time save money to spam a dozen road spikes in advance on that round (12 sets of spikes will deal ~120 damage, almost enough to pop a MOAB outright). Each failure teaches which tower or bloon type was the weak link in your defense -- shore that up and you'll go further on the next run.
Become a Multi-Track Master
By following these tips -- adapting to multi-lane dynamics, utilizing the new towers effectively, and honing your general tower placement and upgrade decisions -- you'll steadily progress from a BTD3 beginner to a multi-track master. Bloons Tower Defense 3's learning curve is part of the fun: every track and round conquered is satisfying, and unlocking the secret content (those extra tracks and the Monkey Storm ability) will feel well-earned. Now get out there and pop those bloons before they escape! Good luck, and enjoy the bloon-popping mayhem.