BTD 4 Expert Strategies & Tips
Master BTD4's hardest challenges with expert strategies for Hard mode, MOAB battles, tower combinations, and economic management. Complete guide to all 16 towers and challenge modes.
BTD4 Expert Overview
Bloons Tower Defense 4 (BTD4) was released by Ninja Kiwi in late 2009 and was the last major Flash-based entry before the series shifted to modern engines. It added new towers, upgrades and game modes on top of the original formula and introduced challenge rounds and modes that push players' strategic skills. BTD4 also spawned an Expansion version that added more towers, tracks and a special Deflation Mode. This guide provides expert-level strategies for conquering BTD4's hardest difficulties and challenge levels.
Game Modes and Difficulties
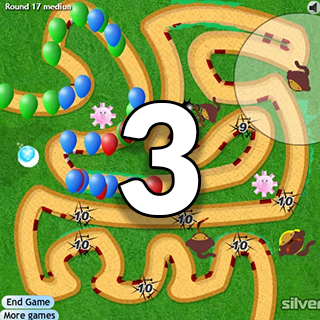
BTD4 offers three difficulty settings. On Easy you start with 200 lives and play 50 rounds; Medium drops you to 150 lives with 60 rounds; Hard gives only 100 lives and extends to 75 rounds, while tower and road-item prices increase. In addition to the normal campaign, the game includes:
Sandbox Mode
Unlocked at rank 26, allows infinite cash and lives so you can experiment or build dream defenses.
Apopalypse Mode
Unlocked at round 31, sends continuous waves of bloons without breaks. Surviving requires early planning and constant pressure.
Lollipop Challenge and MOAB Challenge
Special challenge rounds introduced on Ninja Kiwi's site. The MOAB Challenge features huge MOAB blimps; the Lollipop Challenge restricts available towers and upgrades.
Expansion-Only Modes
The Expansion adds new tracks and two towers (Dartling Gun and Spike Factory), plus Deflation Mode where you start with $50,000 cash but earn no additional income. It also includes Tower Specialties that discount one tower type while increasing the cost of others, encouraging different play styles.
Key Differences on Hard Mode
Hard Mode stretches your resources because you start with fewer lives and money, enemies are more numerous and towers cost more. Key adjustments include:
Economy Management
Building Banana Farms early becomes critical because you have more rounds to survive. Each Banana Farm produces extra cash each round; upgrading them to Banana Plantation/Republic quickly pays for high-cost towers.
Camo and Lead Detection
Hard introduces camo bloons earlier and mixes lead bloons into regular rounds. You must prepare detection (e.g. Monkey Beacon's Sonar Beacon, Monkey Ace's Spy Plane or Monkey Buccaneer's Crow's Nest) and lead-popping damage (Bomb Tower or Fire-based upgrades) by round 20.
Longer Round Count
With 75 rounds, Hard Mode requires a long-term plan. Use cheap towers early and upgrade them gradually. Late game will require MOAB-popping towers like MOAB Mauler bombs or fully upgraded Super Monkeys.
Understanding Towers and Upgrades
BTD4 features 16 main towers. Below is a summary of the most important ones for expert play along with recommended upgrades and strategic notes. Use the Banana Farm to finance expensive upgrades; sell it later to fund late-game towers.
Dart Monkey
Cheap starter with powerful upgrade paths
Key Upgrades: Piercing Darts lets darts pop two bloons; Long Range increases radius; Spike-O-Pult turns it into a catapult throwing spiked balls that roll through multiple bloons; Triple Shot allows three darts per throw.
When to use:
Spike-O-Pult is excellent on straight lanes -- place several early to save money. Keep a few Triple-Shot monkeys near exits as insurance.
Tack Shooter
Area damage specialist with devastating Ring of Fire
Key Upgrades: Fires 8 tacks; upgrades include Faster Shooting, Extra Range, Blade Shooter and Ring of Fire which releases a continuous flame ring that melts lead, ceramic and black bloons.
When to use:
Position Tack Shooters at corners where multiple path segments pass by. The Ring of Fire upgrade is one of the best for mid-game; purchase it by rounds 40-45.
Bomb Tower (Cannon)
Explosive damage and MOAB killer
Key Upgrades: Bigger Bombs, Longer Range, Missile Launcher, MOAB Mauler (increases damage 10x to MOABs and BFBs).
When to use:
Essential for lead bloons and MOABs. Upgrade to Missile Launcher around rounds 30-35 and to MOAB Mauler before round 45 to survive MOAB Challenge. Remember bombs cannot pop black/zebra bloons, so pair with sharp towers.
Boomerang Thrower
Wide-arc coverage with piercing glaives
Key Upgrades: Upgrades allow boomerangs to pierce more bloons (Multi Target) and spin around (Glaive Thrower).
When to use:
Boomerang throwers provide wide-arc coverage. Upgrading to Glaive Thrower in the mid-game helps clear pink and yellow swarms.
Ice Tower
Freezing support to stall bloon rushes
Key Upgrades: Improved Freeze, Permafrost (slows bloons), Snap Freeze (freezes bloons when popped), Arctic Wind (creates long-lasting freeze).
When to use:
Freeze towers slow and clump bloons for bombs to finish them. Position them away from dart and buccaneer towers because sharp projectiles cannot pop frozen bloons.
Mortar Tower
Long-range indirect fire support
Key Upgrades: Greater Accuracy, Rapid Reload, Balloon Buster and Mortar Battery (fires multiple shells).
When to use:
Mortars ignore line-of-sight, making them perfect for hitting both bloon paths. Aim near the entrance to damage grouped bloons. Mortar shells strip camo layers when upgraded.
Glue Gunner
Slowing and corrosive damage over time
Key Upgrades: Stickier Glue, Glue Soak, Corrosive Glue (damages bloons over time), Glue Splatter (splashes glue).
When to use:
Glue gunners slow and soften bloons; place near the start or end of the track. Use corrosion on thick waves but focus on higher-damage towers later.
Monkey Beacon
Support tower that buffs nearby allies
Key Upgrades: Wider Influence increases buff radius; Jungle Drums boosts attack speed; Sonar Beacon reveals camo bloons; Monkey Storm calls a screen-clearing airstrike.
When to use:
Always include a Beacon near clusters of towers to extend their range and reveal camo bloons. Monkey Storm is a panic button during MOAB rushes; it destroys all bloons on screen.
Monkey Ace
Airborne firepower with camo detection
Key Upgrades: Pineapple Express, Spy Plane (detects camo), Rapid Fire, Operation Dart Storm (fires dozens of darts at once).
When to use:
Multiple Monkey Aces with Dart Storm create enormous area DPS. Combine with Monkey Beacon for faster firing and camo detection.
Monkey Buccaneer
Water-based powerhouse with camo sight
Key Upgrades: Grapple Shot, Crow's Nest (camo detection), Longer Cannons, Battleship (double attack speed).
When to use:
Place on water maps; Battleship is an inexpensive alternative to Super Monkey. Use Crow's Nest to provide camo detection to nearby towers.
Monkey Apprentice
Cost-efficient magic with tornado pushback
Key Upgrades: Intense Magic, Fireball, Summon Whirlwind and Tempest Tornado which pushes bloons back.
When to use:
Monkey Apprentices are extremely cost-efficient: their tornado ability pushes bloons to the start and deals area damage. Experts often rely on multiple Apprentices rather than expensive Super Monkeys.
Super Monkey
The ultimate but priciest tower
Key Upgrades: Super Range, Laser Vision, Plasma Vision, Sun God (shoots laser beams continuously).
When to use:
The ultimate but priciest tower. Sun God can obliterate MOABs and BFBs, but only invest after building a strong economy. Sell Banana Farms to afford this upgrade around round 50.
Banana Farm
Essential income generator for expert play
Key Upgrades: More Bananas, Banana Plantation, Banana Republic, Banana Research Facility.
When to use:
Build at least two Banana Farms by round 15. Early investment yields exponential returns, letting you afford MOAB Maulers and Ring of Fire upgrades later.
Dartling Gun & Spike Factory
Expansion-exclusive towers
Introduced in the BTD4 Expansion. Dartling Gun fires darts along your mouse pointer; upgrades add lasers and rockets; it provides continuous high-pierce damage. Spike Factory lays road spikes automatically; upgrades increase rate, produce spiked balls and eventually Spiker Ball for heavier damage.
When to use:
Use Dartling Guns for flexible crowd control; reposition by moving your mouse. Place Spike Factories near exits to catch stray bloons -- especially in Deflation Mode where you cannot add manual spikes later.
Bloon Resistances
Black bloons are immune to explosives; white bloons are immune to freezing; zebra bloons inherit both immunities; lead bloons are immune to sharp projectiles; camo bloons cannot be targeted without detection upgrades.
Expert Strategies for Hard Modes and Challenges
Early-Game Setup
Focus on Cost-Effective Towers
Start with Dart Monkeys and Tack Shooters. On Hard mode, one Dart Monkey with Piercing Darts and one Tack Shooter positioned at a corner can clear the first four rounds cheaply. Build two to three more cheap towers before buying expensive upgrades.
Invest in Banana Farms
By round 10-12, place your first Banana Farm. Prioritise the Banana Plantation upgrade to double income; by round 20 you should have two or three Banana Farms producing large sums. This economy lets you fund high-tier towers later.
Unlock Key Towers
Use experience points to unlock Tack Shooter, Bomb Tower and Super Monkey first, as they form the backbone of many expert strategies. Avoid overspending on road items (spikes and glue) early because money is scarce.
Mid-Game: Preparing for Lead, Camo and Ceramics
Lead and Camo Preparation
Place a Bomb Tower before round 20 (first lead bloon appears around round 23 depending on the track). Upgrade to Missile Launcher soon after. Build a Monkey Beacon or upgrade a Monkey Ace with Spy Plane to detect camo bloons by round 24.
Spread Out Your Towers
Avoid clustering everything at the entrance. Place backup Dart Monkeys or Spike Factory near the exit to catch leaks. Use Mortars to provide long-range support that doesn't rely on line of sight.
Utilise Glue and Ice
A single Ice Tower with Snap Freeze or a Glue Gunner with Corrosive Glue can stall fast bloons, giving your Bomb Towers time to reload. Keep them away from towers using sharp attacks because frozen bloons cannot be popped by darts or tacks.
Upgrade Tack Shooters
Around round 30, begin upgrading your Tack Shooters to Blade Shooter. By round 40, convert them to Ring of Fire; this upgrade melts lead, black and ceramic bloons and forms an impenetrable wall. On complex tracks, place Ring of Fire near choke points where bloons pass multiple times.
Late-Game: Defending Against MOABs and BFBs
MOAB Maulers and Glaive Throwers
Prepare for the first MOAB (round 46 on Hard). Upgrade at least three Bomb Towers to MOAB Mauler between rounds 44-45. Complement them with Boomerang Throwers upgraded to Glaive Thrower to shred the stream of smaller bloons released from a MOAB.
Monkey Apprentices Over Super Monkeys
Many experts advocate spamming Monkey Apprentices with Whirlwind/Tempest Tornado because they are cheaper and effectively push bloons backward. Only invest in a Super Monkey when you have a strong economy and need high single-target DPS. If you build one, upgrade sequentially to Sun God around rounds 50-55.
Monkey Beacon Support
Place a Monkey Beacon near your Bomb Towers and Ring of Fire clusters. Upgrade to Wider Influence and Jungle Drums around rounds 26-30, and to Sonar Beacon for camo detection. Keep money for the Monkey Storm ability; triggering it instantly clears the screen of bloons (very useful in challenge modes).
Road Spikes and Pineapple Bombs
Use road spikes sparingly as a last line of defence; drop them near the exit if a rush threatens to leak. Pineapple bombs (expansion only) can burst lead or ceramic clusters on demand; time them to explode just as bloons arrive.
Selling and Rebuying
Don't be afraid to sell early towers (e.g., Banana Farms or cheap Dart Monkeys) in the last 10 rounds. Use the cash to upgrade MOAB Maulers or buy a Sun God or Dartling Gun. In Deflation mode you cannot earn new income, so invest all your starting cash into a balanced mix of Ring of Fire, MOAB Maulers and Spike Factories; adjust placements during the build phase because there is no mid-round economy.
Track-Specific and Challenge Tips
Single-Path Beginner Tracks
Place a Spike-O-Pult near the start and a Bomb Tower near the centre. Use one or two Tack Shooters at corners; upgrade to Ring of Fire before round 40. Stagger your towers so each section has coverage -- early, mid and late.
Multi-Path or Advanced Tracks (e.g., Bus Route)
Use Mortars and Monkey Aces because their shots can reach multiple lanes. Centralise towers at intersections to cover more than one path. Glue or Ice can stall one path while your main damage deals with the other.
Lollipop and MOAB Challenges
These have limited towers. For the Lollipop Challenge, rely on Ring of Fire and Monkey Apprentices; invest in a Monkey Beacon early for camo detection. For the MOAB Challenge, build several MOAB Maulers and position them so each can shoot the blimps multiple times; use Monkey Storm or Pineapples in emergencies.
Apopalypse Mode
Since waves are continuous, there is no time to place towers between rounds. Prepare by building multiple Banana Farms and cost-efficient towers early. Stagger your upgrades; build a Bomb Tower by round 20 and upgrade to Ring of Fire soon after. Using multiple Whirlwind Apprentices ensures bloons are constantly pushed backwards while you farm.
Deflation Mode (Expansion)
With $50,000 starting cash and no income, plan your entire defence in advance. Buy several MOAB Maulers, two or three Ring of Fire towers, a Monkey Beacon with Sonar and Jungle Drums, and a Super Monkey (Plasma or Sun God). Place Spike Factories at exits. You can micro-adjust your Dartling Gun during the game by moving your mouse -- aim at the densest bloon clusters.
Advanced Combos and Synergies
Ring of Fire + Glue/Whirlwind
Combining a Ring of Fire with a Glue Gunner (Corrosive glue) or Monkey Apprentice (Whirlwind) multiplies efficiency: the glue/tornado slows or sends bloons back, allowing the Ring to burn them multiple times. This combo devastates ceramic and rainbow waves.
Bomb Maulers + Monkey Beacon
A cluster of Bomb Towers upgraded to MOAB Mauler under a Monkey Beacon's Jungle Drums aura produces rapid, high-damage bursts. Add a Beacon with Sonar to handle camo MOABs in challenge rounds.
Dartling Gun + Spike Factory (Expansion)
Use the Dartling Gun to continuously chip away at bloon clusters while the Spike Factory lays spiked balls at the exit. This synergy is particularly strong on maps with long straight lanes.
Mortar + Ice
Mortar shells strip camo and damage bloons, while the Ice Tower freezes and slows them. When used together at choke points, bombs or Ring of Fire finish the frozen clusters.
Master BTD4 and Beyond
Bloons Tower Defense 4 remains one of the most challenging entries in the series due to its limited tower pool and long rounds. Mastering it requires efficient economy management, knowledge of tower strengths and weakness, and the ability to adjust tactics to each track and challenge. Focus on Banana Farm economy early, transition into Ring of Fire, MOAB Maulers and Whirlwind Apprentices by the mid-game, and deploy Sun God or Dartling Gun only when your finances allow. With practice and the expert strategies presented above, you'll be able to conquer Hard Mode, survive apopalypse and deflation modes, and enjoy the thrill of beating MOAB and challenge levels in BTD4.